
一、下载安装包
从 https://github.com/v2ray/v2ray-core/releases/tag/v4.28.2 下载 v2ray-linux-64.zip 文件并解压,实际上选择合适自己机器的就行了,这里选用的是最小包解压即用。
二、配置 config.json 文件
因为我们的 v2ray 此时是用来作为客户端工作 所以需要配置节点
节点的配置文件为 config.json
节点文件可以从 v2ray 的 Windows 客户端导出
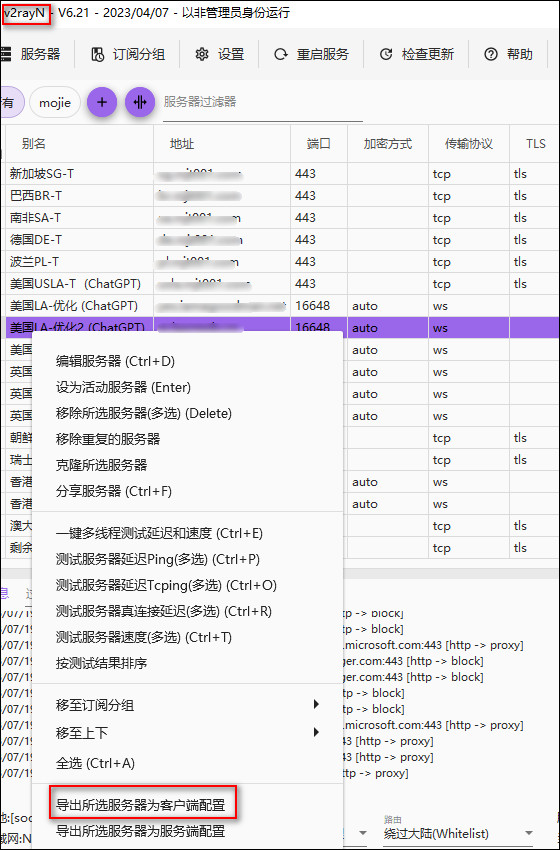
前提是我们在 Windows 客户端使用的 v2ray 已经有服务器节点可用;则此操作就是更便捷的为 Linux下的 v2ray 客户端配置服务器节点。
三、运行
切换到文件目录:检查配置文件,成功效果如下
./v2ray -test -config config.json

运行
./v2ray -config config.json

linux 让进程在后台可靠运行的几种方法:https://lulublog.cn/p/1uqMT2
宝塔可以安装:进程守护管理器
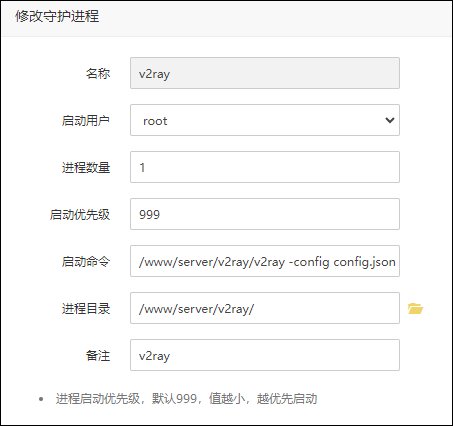
四、github
socks5 代理
git config --global http.https://github.com.proxy socks5://127.0.0.1:10808
git config --global https.https://github.com.proxy socks5://127.0.0.1:10808
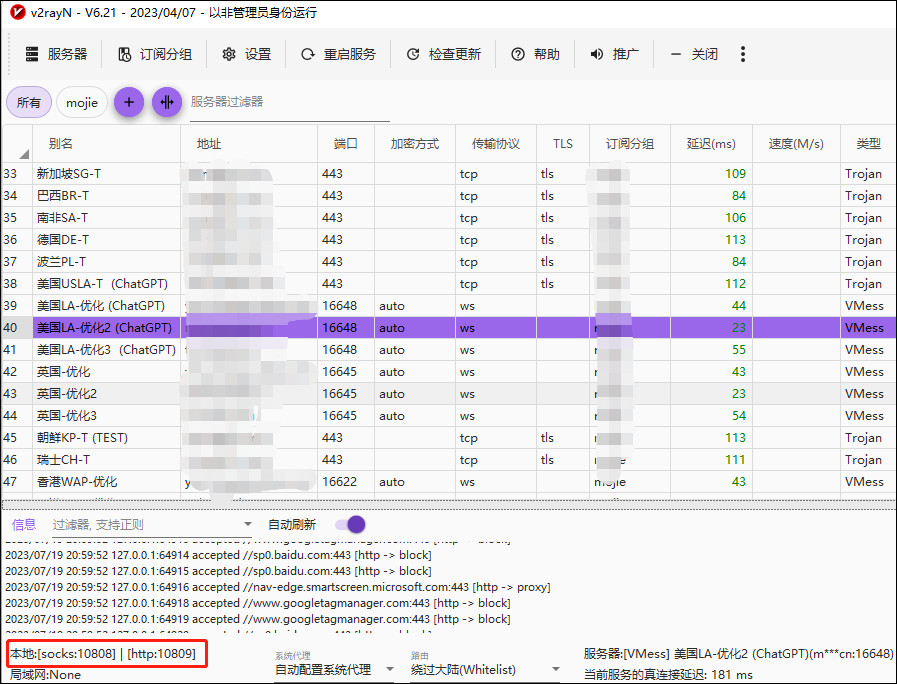
其中的 10808 端口为我们配置文件中配置的端口,每个人的可能都不相同
http 代理
git config --global http.https://github.com.proxy https://127.0.0.1:1080
git config --global https.https://github.com.proxy https://127.0.0.1:1080
取消设置
git config --global --unset http.proxy
git config --global --unset https.proxy
五、配置curl、wget等命令使用代理
5.1、方法一
(推荐)
修改文件“/etc/profile”,在文件结束位置增加如下内容:
# 设置http代理
export http_proxy=socks5://127.0.0.1:10808
# 设置https代理
export https_proxy=socks5://127.0.0.1:10808
# 设置ftp代理
export ftp_proxy=socks5://127.0.0.1:10808
# 17.16.x.x为我们自己的云服务器的内网IP 配置为no_proxy代表内网传输不走代理
export no_proxy="172.16.x.x"
修改重启
source /etc/profile
5.2、方法二
(在当前终端临时生效)
使代理生效
export http_proxy=socks5://127.0.0.1:10808
export https_proxy=socks5://127.0.0.1:10808
export ftp_proxy=socks5://127.0.0.1:10808
export no_proxy="172.16.x.x"
使代理失效
unset http_proxy
unset https_proxy
unset ftp_proxy
unset no_proxy
5.3、方法三
(针对单用户生效)
编辑文件 vim ~/.bashrc 添加以下内容
# set proxy
function setproxy() {
    export http_proxy=socks5://127.0.0.1:10808
    export https_proxy=socks5://127.0.0.1:10808
    export ftp_proxy=socks5://127.0.0.1:10808
    export no_proxy="172.16.x.x"
}
# unset proxy
function unsetproxy() {
    unset http_proxy https_proxy ftp_proxy no_proxy
}
保存退出,执行 source ~/.bashrc ,使得配置立即生效。
在终端执行 setproxy 使代理生效
在终端执行 unsetproxy 使代理生效