一、下载
打开 composer.json,require 新增引入
"lucadegasperi/oauth2-server-laravel": "5.1.*"
执行 composer update
composer update
lucadegasperi/oauth2-server-laravel:https://github.com/lucadegasperi/oauth2-server-laravel
二、配置
2.1、基础配置
配置文档:https://github.com/lucadegasperi/oauth2-server-laravel/blob/master/docs/getting-started/laravel-5.md
修改 config/app.php 的 providers 属性
LucaDegasperi\OAuth2Server\Storage\FluentStorageServiceProvider::class,
LucaDegasperi\OAuth2Server\OAuth2ServerServiceProvider::class,
修改 config/app.php 的 aliases 属性
'Authorizer' => LucaDegasperi\OAuth2Server\Authorizer::class,
修改 app/Http/Kernel.php 的 middleware 属性
\LucaDegasperi\OAuth2Server\Middleware\OAuthExceptionHandlerMiddleware::class,
修改 app/Http/Kernel.php 的 routeMiddleware 属性
'oauth' => \LucaDegasperi\OAuth2Server\Middleware\OAuthMiddleware::class,
'oauth-user' => \LucaDegasperi\OAuth2Server\Middleware\OAuthUserOwnerMiddleware::class,
'oauth-client' => \LucaDegasperi\OAuth2Server\Middleware\OAuthClientOwnerMiddleware::class,
'check-authorization-params' => \LucaDegasperi\OAuth2Server\Middleware\CheckAuthCodeRequestMiddleware::class,
发布配置文件
php artisan vendor:publish
执行数据迁移
php artisan migrate
修改 config/api.php
'auth' => [
    'jwt' => 'Dingo\Api\Auth\Provider\JWT'
],
2.2、oauth2
修改 config/oauth2.php
'grant_types' => [
    'authorization_code' => [
        'class' => '\League\OAuth2\Server\Grant\AuthCodeGrant',
        'access_token_ttl' => 3600,
        'auth_token_ttl' => 3600,
    ],
],
修改 app/Http/routes.php
Auth::loginUsingId(1);
Route::get('oauth/authorize', ['as' => 'oauth.authorize.get', 'middleware' => ['check-authorization-params', 'auth'], function() {
    $authParams = Authorizer::getAuthCodeRequestParams();
    $formParams = array_except($authParams,'client');
    $formParams['client_id'] = $authParams['client']->getId();
    $formParams['scope'] = implode(config('oauth2.scope_delimiter'), array_map(function ($scope) {
        return $scope->getId();
    }, $authParams['scopes']));
    return View::make('oauth.authorization-form', ['params' => $formParams, 'client' => $authParams['client']]);
}]);

Route::post('oauth/authorize', ['as' => 'oauth.authorize.post', 'middleware' => ['check-authorization-params', 'auth'], function() {
    $params = Authorizer::getAuthCodeRequestParams();
    $params['user_id'] = Auth::user()->id;
    $redirectUri = '/';
    if (Request::has('approve')) {
        $redirectUri = Authorizer::issueAuthCode('user', $params['user_id'], $params);
    }
    if (Request::has('deny')) {
        $redirectUri = Authorizer::authCodeRequestDeniedRedirectUri();
    }
    return Redirect::to($redirectUri);
}]);

Route::post('oauth/access_token', function() {
    return Response::json(Authorizer::issueAccessToken());
});
新建 resources/views/oauth/authorization-form.blade.php

2.3、生成 client
创建模型
php artisan make:model Client
修改 database/factories/ModelFactory.php
$factory->define(App\Client::class, function (Faker\Generator $faker) {
    return [
        'id' => str_random(38),
        'secret' => str_random(38),
        'name' => $faker->word,
    ];
});
进入 tinker
php artisan tinker
生成 client
factory(App\Client::class)->create()
将数据插入 oauth_client_endpoints 表
client_id:刚刚生成的 id
redirect_uri:https://lulublog.cn
三、oauth2
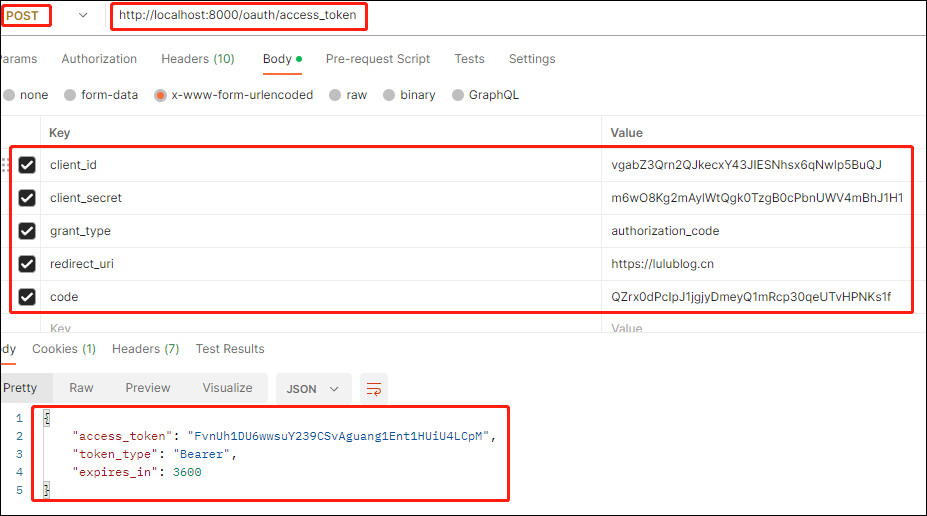
访问:http://localhost:8000/oauth/authorize?client_id=&redirect_uri=https://lulublog.cn&response_type=code,注意这里的 client_id 填写生成的 id,点击 Approve 会跳转 https://lulublog.cn/?code=,将生成的 code 复制到 postman

复制生成的 access_token
修改 app/Http/routes.php
$api = app('Dingo\Api\Routing\Router');

$api->version('v1', function ($api){
    $api->group(['namespace'=>'App\Api\Controllers'], function($api){
        $api->post('user/login','AuthController@authenticate');
        $api->post('user/register','AuthController@register');
        $api->group(['middleware'=>'oauth'], function($api){
            $api->get('user/me','AuthController@getAuthenticatedUser');
            $api->get('lessons','LessonsController@index');
            $api->get('lessons/{id}','LessonsController@show');
        });
    });
});
访问:http://localhost:8000/api/lessons,发现报错了,后面拼接刚刚的生成 access_token,发现数据正常返回了。
 laravel5.1-第11.5章-开发API-oauth2

